Climbing Mount St Helens
Permit Info
You can get more info about climbing permits from the Mount St Helens Institute here
Permits go on sale on 2/1 at 9am every year. They go quick, so you will want to be online right away! If you don’t get a permit in time or for your desired date you can always check out purmit.com an authorized place where people can buy and sell Mount St Helens permits at or below face value.
Gear I used for my climb
For my climb in mid-June I brought:
Trekking poles
50L Osprey pack, (overkill on size, but my daypack doesn’t have ice axe straps)
Microspikes
Ice Axe
Waterproof hiking boots
Short Gaiters
Puffy jacket
Waterproof shell
Trash bag diaper for glissading
The only thing I would consider changing is bringing rain pants since my trash bag diaper didn’t hold up well while glissading and I ended up with an ice burn on my derrière. Another girl in my group also got an ice burn, and she had rain pants so it may have been unavoidable!
Food I brought
Packet of poptarts for breakfast
Packet of bacon jerky for breakfast/snacking
Two packets of salted watermelon Cliff Bloks
Two running gels
One Clif bar
One Larabar
Packet of flavored tuna/flour tortilla for lunch
I thought I may have packed too many snacks, but I ended up eating all of this. This hike is long and hard and you will want a lot of food. I get tired of bars, and I hate stopping as often as I need to snack, so I fill my hipbelt pockets with products generally marketed towards runners and other endurance athletes. I can easily pop them open and get some quick calories and carbs without needing to stop. I save the bars, jerky, and tuna packet for breaks along the way or lunch at the summit!
My Climb
The real adventure started the morning of February 1st when we tried to get our permits. Doris assured me it wouldn’t be an issue and that I didn’t need to sit in front of my computer at 9am like she was. When I woke up that morning I received a frantic text message from her that everyone in our group was trying to get permits and that no one was successful due to issues with the site.
I was on the bus to work and quickly went to the site on my phone. To my surprise the second time I tried I was able to check out with our seven permits on a weekend close to our desired date! Multiple people reported they were never able to get through and it turns out there were major server issues due to the demand for permits and Mount St Helens Institute shut down the permitting site until 2/26 in order to find a server that could handle the demand. I was pretty fortunate I was able to get through!
In the months leading up to our climb, we had some people drop out so I invited my friend Brooke to tag along. She has just started to get into hiking with me so it was a bit of a stretch for her, but she happily accepted and I am so proud of her for venturing out of her comfort zone and coming along on this crazy adventures with me.
Day One: Ape Caves

The upper Ape Cave trail is a must if you are in the area!
We climbed the Sunday of Father’s Day. We all left Seattle around 10:30 am on Saturday to make our way to Marble Mountain Sno-Park to set up our camp for the evening. My friend Brooke and I opted to sleep in the back of my SUV on an air mattress. Everyone else in our group set up a tent on the grass outside their cars.
After we all met up we drove to Ape Caves a few miles down the road. I have done the lower cave trail before and found it to be disappointing, so I convinced everyone in our group that we should do the upper cave trail instead, which is longer and more difficult. Everyone may have hated me for this since the upper cave trail is 1.5 miles of scrambling over boulder piles, some minor climbing up walls, and even crawling through very small rock openings. Once you get through all of that you make your way to a section where the cave roof opens up and you get amazing light rays coming in through the roof. Then it’s a short walk to the ladder out of the cave where you can begin to make your 1.5-mile hike back to the trailhead. I wouldn’t recommend the upper cave trail for families with small children, but it’s definitely the more scenic trail of the two options!
After finishing we made our way back to camp and made dinner before calling it an early night around 9:30 to prep for our 3 am alarms. I took a Benedryl in order to make myself more sleepy, but I still found myself tossing and turning in anticipation of our climb!
Day Two: Climbing Mount St Helens
I woke up at 3 am and was ready to go around 3:30 am, but since everyone else in our party had set up tents to sleep in it took them a little longer to break down camp and get onto the trail. We started hiking at 4:30 am and were the first people on the trail.

When the mountain is a lot steeper than it looks!
Doris Laid out our timeline on her blog post about our climb;
Sunday June 17, 2018
Here is a quick timeline of our day:
4:24 AM – we hit the trail
5:38 AM – we hit Chocolate Falls
7:47 AM – we hit the weather station
11:45 AM – we summited
2:00 PM- we glissaded back to the weather station
5:30 PM- I exited the trail
I have often been described as a hiking, “diva” I usually take off in the beginning and leave everyone with me behind. Then I get tired and ask people to wait for me when they catch up….diva indeed. Since this was such a long hike and it required some skills I wasn’t fully comfortable with I decided NOT to do that and stayed with our group for most of the ascent (even though my inner diva wanted to run up the mountain)
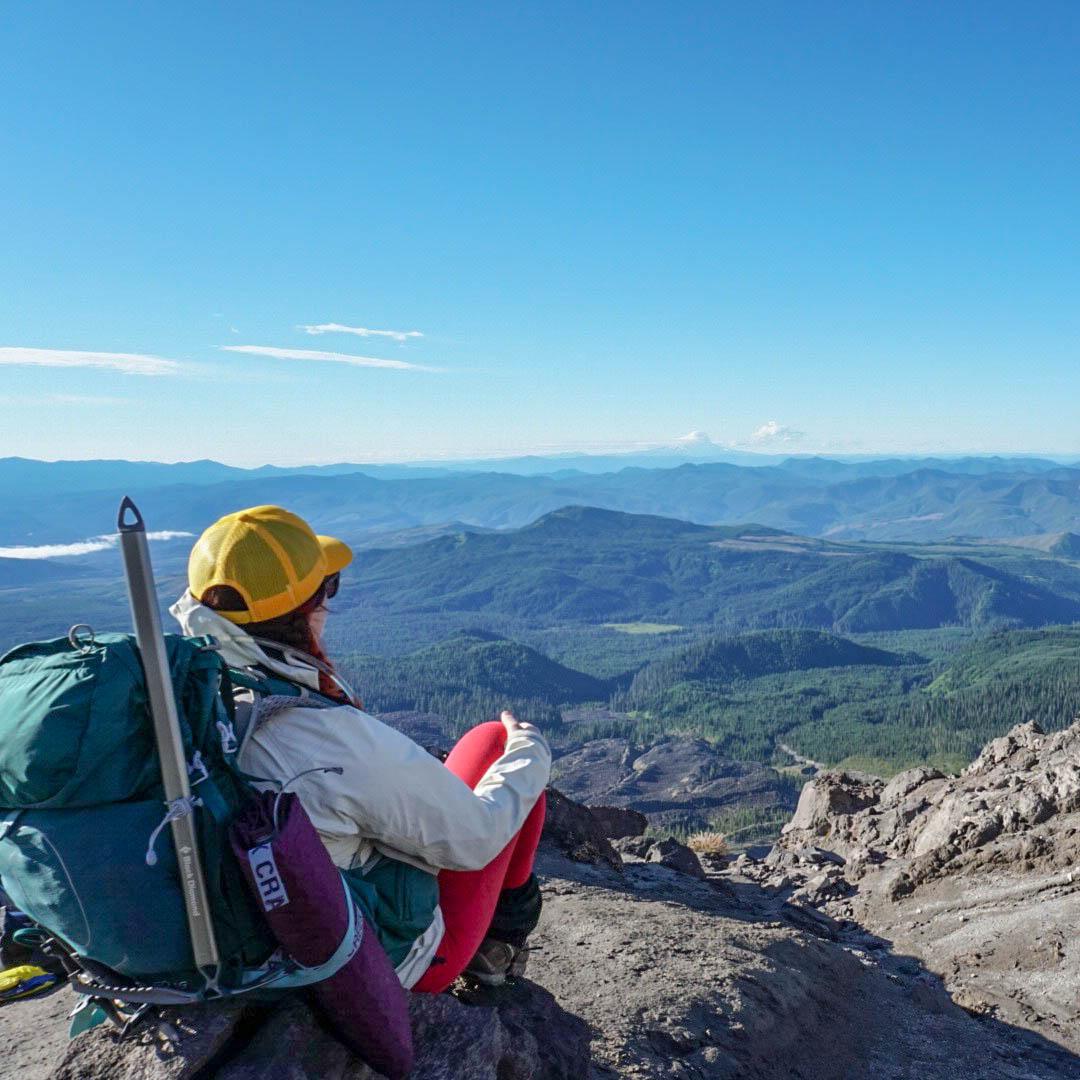
Enjoying the view during one of our breaks! Thanks for the photo Doris!
A little after we passed Chocolate falls and started traveling up past the tree line we started getting blasted with 35-40mph wind gusts. My friend Brooke always feels uncomfortable going down loose dirt and scree, and the wind started to make her feel panicky. A little after the weather station she was feeling too anxious to continue going up. So our group opted to stop for a bit to eat a snack and Doris’s boyfriend Cody stayed with Brooke at the weather station since he wasn’t feeling the wind either.

Brooke before she decided she was too anxious to continue. Always trust your gut in these situations!
When we were past the weather station we put on our microspikes and started traveling up the snow instead of the boulders and scree. We could have avoided the snow almost all the way up, but the snow was definitely easier to travel on for those of us that were comfortable. I stayed with our group until the final portion of our ascent. At that point, the snow travel was a little steeper than what I was comfortable with and I really wanted to get to the top of the steep portion we were hiking up, so myself and another member of our group took the lead.

Final push to the summit!
The summit was gorgeous, and it’s hard to capture in photos how epic and barren it is up there. There was still a bit of cornice left so we couldn’t see into the crater very well. We anxiously watched as a few people walked and posed for photos on it…please for the love of all that is good don’t stand on a cornice! The view or the photo isn’t worth the risk! After finishing our lunch and getting some group photos we started our descent.

Me on the summit, see the cornice on the right side of the photo? DON'T STAND ON THAT.

View into the crater!
This was my first time glissading so I took it EXTREMELY slow. At first, I stopped every 10-20 feet because I wanted to make sure I was in control of my speed the whole time. My intense anxiety may have come about after watching a couple of foolish people throw themselves into glissade chutes from the summit without an ice axe and struggle to stop or gain control of their speed. After the first 100 feet or so I felt comfortable controlling my speed with my ice axe so I quit stopping myself so often and continued to take it slow down the mountain. At one point a ranger who was checking permits stopped us to let us know we were heading toward Climbers Bivouac/the Monitor Ridge route, not Marble Mountain Sno-park/Worm flows route and that they had a few people get lost. Our plan was to take the glissade chute we were in down until it ended in a scree field and reassess our route from there (I had our GPS track running on my phone throughout the entirety of the climb) but I think he was nervous after some climbers had gotten lost and asked us to make our way back over to the correct route. I wasn’t going to argue!

Glissading is fun! Even when your trash bag diaper falls apart and you end up with an ice burn on your bum.
We walked over to the Worm Flows route and started glissading again. Doris was in front of me when she suddenly stopped. I stopped as well and asked her what was going on, she responded with, “It’s really scary…..” Based on my experiences hiking and climbing with Doris, it takes A LOT to scare her, and sure enough we were at the really steep part I had struggled with ascending before. She asked a more experienced member of our group to come down and assess the glissade chute with her, meanwhile I saw a boot path directly to my left leading to another glissade chute on more moderate terrain and opted to do that while two members of our group followed me. Doris opted to walk down the steep part instead of glissading and then we all met back up to finish our glissade down to the weather station where Brooke and Cody were waiting. There was one last easy glissade chute after the weather station, and Brooke had rented an ice axe specifically for the climb, so I convinced her to give it a go. She seemed nervous at first but she was all smiles and, “That was fun! I want to do it again!” when she got to the bottom. I sense more climbing and glissading in this woman’s future!

Making my way back to Doris after opting to not glissade down the sketchy steep bit!
Once the glissading ended and we were back onto the boulders, my inner hiking diva came out in full force and I took off down the trail. I had gotten pretty far ahead of everyone when I slipped and tumbled down 4-5 boulders. My head was about to knock into one when the brim of my hat hit it first and my head bounced back instead. It was the kind of fall where you immediately assume you have broken something. I laid there for a few seconds wiggling my limbs and everything seemed to be fine, so then I got up to see if anyone had witnessed my epic fall, but no one had. I am very thankful I had my ice axe attached to my pack correctly, and that the brim of my hat stopped me from hitting my head on a boulder! I took it slightly slower down after that, but I still ended up making it to the trailhead an hour before everyone else. Brooke had the keys to my car, so I set my backpack against my car, set my backpacking chair against that and took a nap until the rest of my group made it down around 5:30.
The entire day I was saying I would never do this again, or climb any other volcano, but the second I got home I started looking up mountaineering courses and gear. I think it’s safe to say I will attempt another summit sometime soon! Anyone up for Adams later this year…?
Thanks again to Doris for convincing me to climb this mountain and for supplying some of the photos for this blog post!
