Getting Started with Photography: How to Expose your Photos
When I got my first DSLR I was TERRIFIED to take it off automatic mode. I had no idea what settings would get me the kind of photos I wanted, so I put it on auto and let the camera decide for me.
If you are in a rush to get a usable photo and don’t have time to experiment, sure, shoot on automatic. But trust me when I tell you that you will never be as happy with a photo where the camera decided all the settings for you over a photo you properly exposed on your own.
This will by no means be an exhaustive guide to exposure, people have written entire books on the subject, so I can’t cover everything here. My goal is that this guide will give you a basic understanding of what settings you need to know and how to change and experiment with them in order to get the photos you want!
Aperture and Depth of Field
Aperture controls how wide the hole in your lens opens when you take your photo. It also controls depth of field. When you look at lenses and you see a number like, “f2.8” that is the maximum aperture that lens opens up to. Aperture is a little confusing at first because the SMALLER the number, the more open the hole is. F2.8 is going to let in a lot more light than f22. When the number is smaller you are also working with a smaller depth of field. This means less of the photo will be in focus. This is great for portraits, not so great for landscape photos.
Here is a photo shot at f1.4. Notice how blurry the background is

This photo was shot at f4, the background is still blurry, but you are able to make out a little more detail.

This photo was shot at f22. Effectively everything is in focus and you can pick out details regardless of how far behind me they are.

Shutter Speed
This was the the easiest concept for me to understand when I started. Shutter speed controls how long the shutter is open when you take a photo. Think of the shutter like your eyelids, you can blink super fast, or you can blink super slow. The main difference is our brain isn’t capturing a still image at the end of a blink. When you are setting your shutter speed think about how you want to capture movement in your scene. Do you want your subject to be perfectly still with no blur? You will need a fast shutter speed. Do you want silky waterfalls or star paths in the night sky? Then you want a slow shutter speed!
Here is an example of a time I messed up setting my shutter speed. I set my cameras settings based on me standing still, then I decided to start jumping from rock to rock and forgot to adjust my shutter speed to be faster. As a result my arm is a little blurred!

Notice the blur in my arm, my shutter speed was too slow!
Another important thing to remember with shutter speed is your own movement as you hold the camera. If you are working with a slower shutter speed you will want to use a tripod in order to keep the image sharp.
ISO
ISO refers to your camera sensor’s sensitivity to light. ISO 100 isn’t very sensitive, use this setting when you are in very bright sunlight. ISO 6400 is very sensitive, use this setting when shooting in the dark. One of the most important things to consider when adjusting your ISO is noise. Wondering what noise is? Look the dark pants and dog in the below photo, notice the graininess? That's noise!

When you shoot at a higher ISO you are going to have more noise like the above in your photo, but if you underexpose a photo hoping to shoot at a lower ISO and try to lighten it up in post processing, you will also end up with noise. I generally opt for a higher ISO to properly expose the photo and decrease the noise in post processing later.
Bringing it all Together
It’s impossible to think about properly exposing a photo without thinking of Aperture, Shutter Speed, and ISO all working together. When you arrive at a scene you want to photograph, stop and think of the kind of shot you are hoping to produce. When I go out I generally start by looking at the light, and deciding on the aperture I want based on the depth of field I am hoping for. Landscape photos I generally shoot from f11-f16 depending on available light. Portraits I shoot at f1.4 -f4 (based on the lens I have on my camera) Then I adjust my shutter speed and ISO in order to expose the photo properly.
Here are some ideas to get you going;
Hoping to photograph the milky way at night? Open the aperture as wide as possible (f2.8 or wider if your lens is capable), bump up the ISO as much as you are comfortable with (think of potential noise) and choose a shutter speed around 20-25 seconds (26 or more and the stars will start to streak)
Are you looking to shoot a backlit portrait at sunset or sunrise? Open that aperture up as much as possible, adjust the ISO down since you have a lot of light to work with, and play with the shutter speed until the photo is exposed how you want. Personally, I under-expose these shots and bump up the shadows in post processing.
Want a sharp landscape photo? Close that aperture to f11 or so, bump up your ISO and Shutter Speed to compensate and get those tack sharp details. If shooting moving water in these situations remember that a longer shutter speed will show soft blurring in the water, a shorter shutter speed will effectively freeze the water's motion.
Using the Light Meter
When you look in your viewfinder you will notice a long line with lots of little lines on it and some numbers. It's called a light meter and this is what it looks like on my cameras LCD:
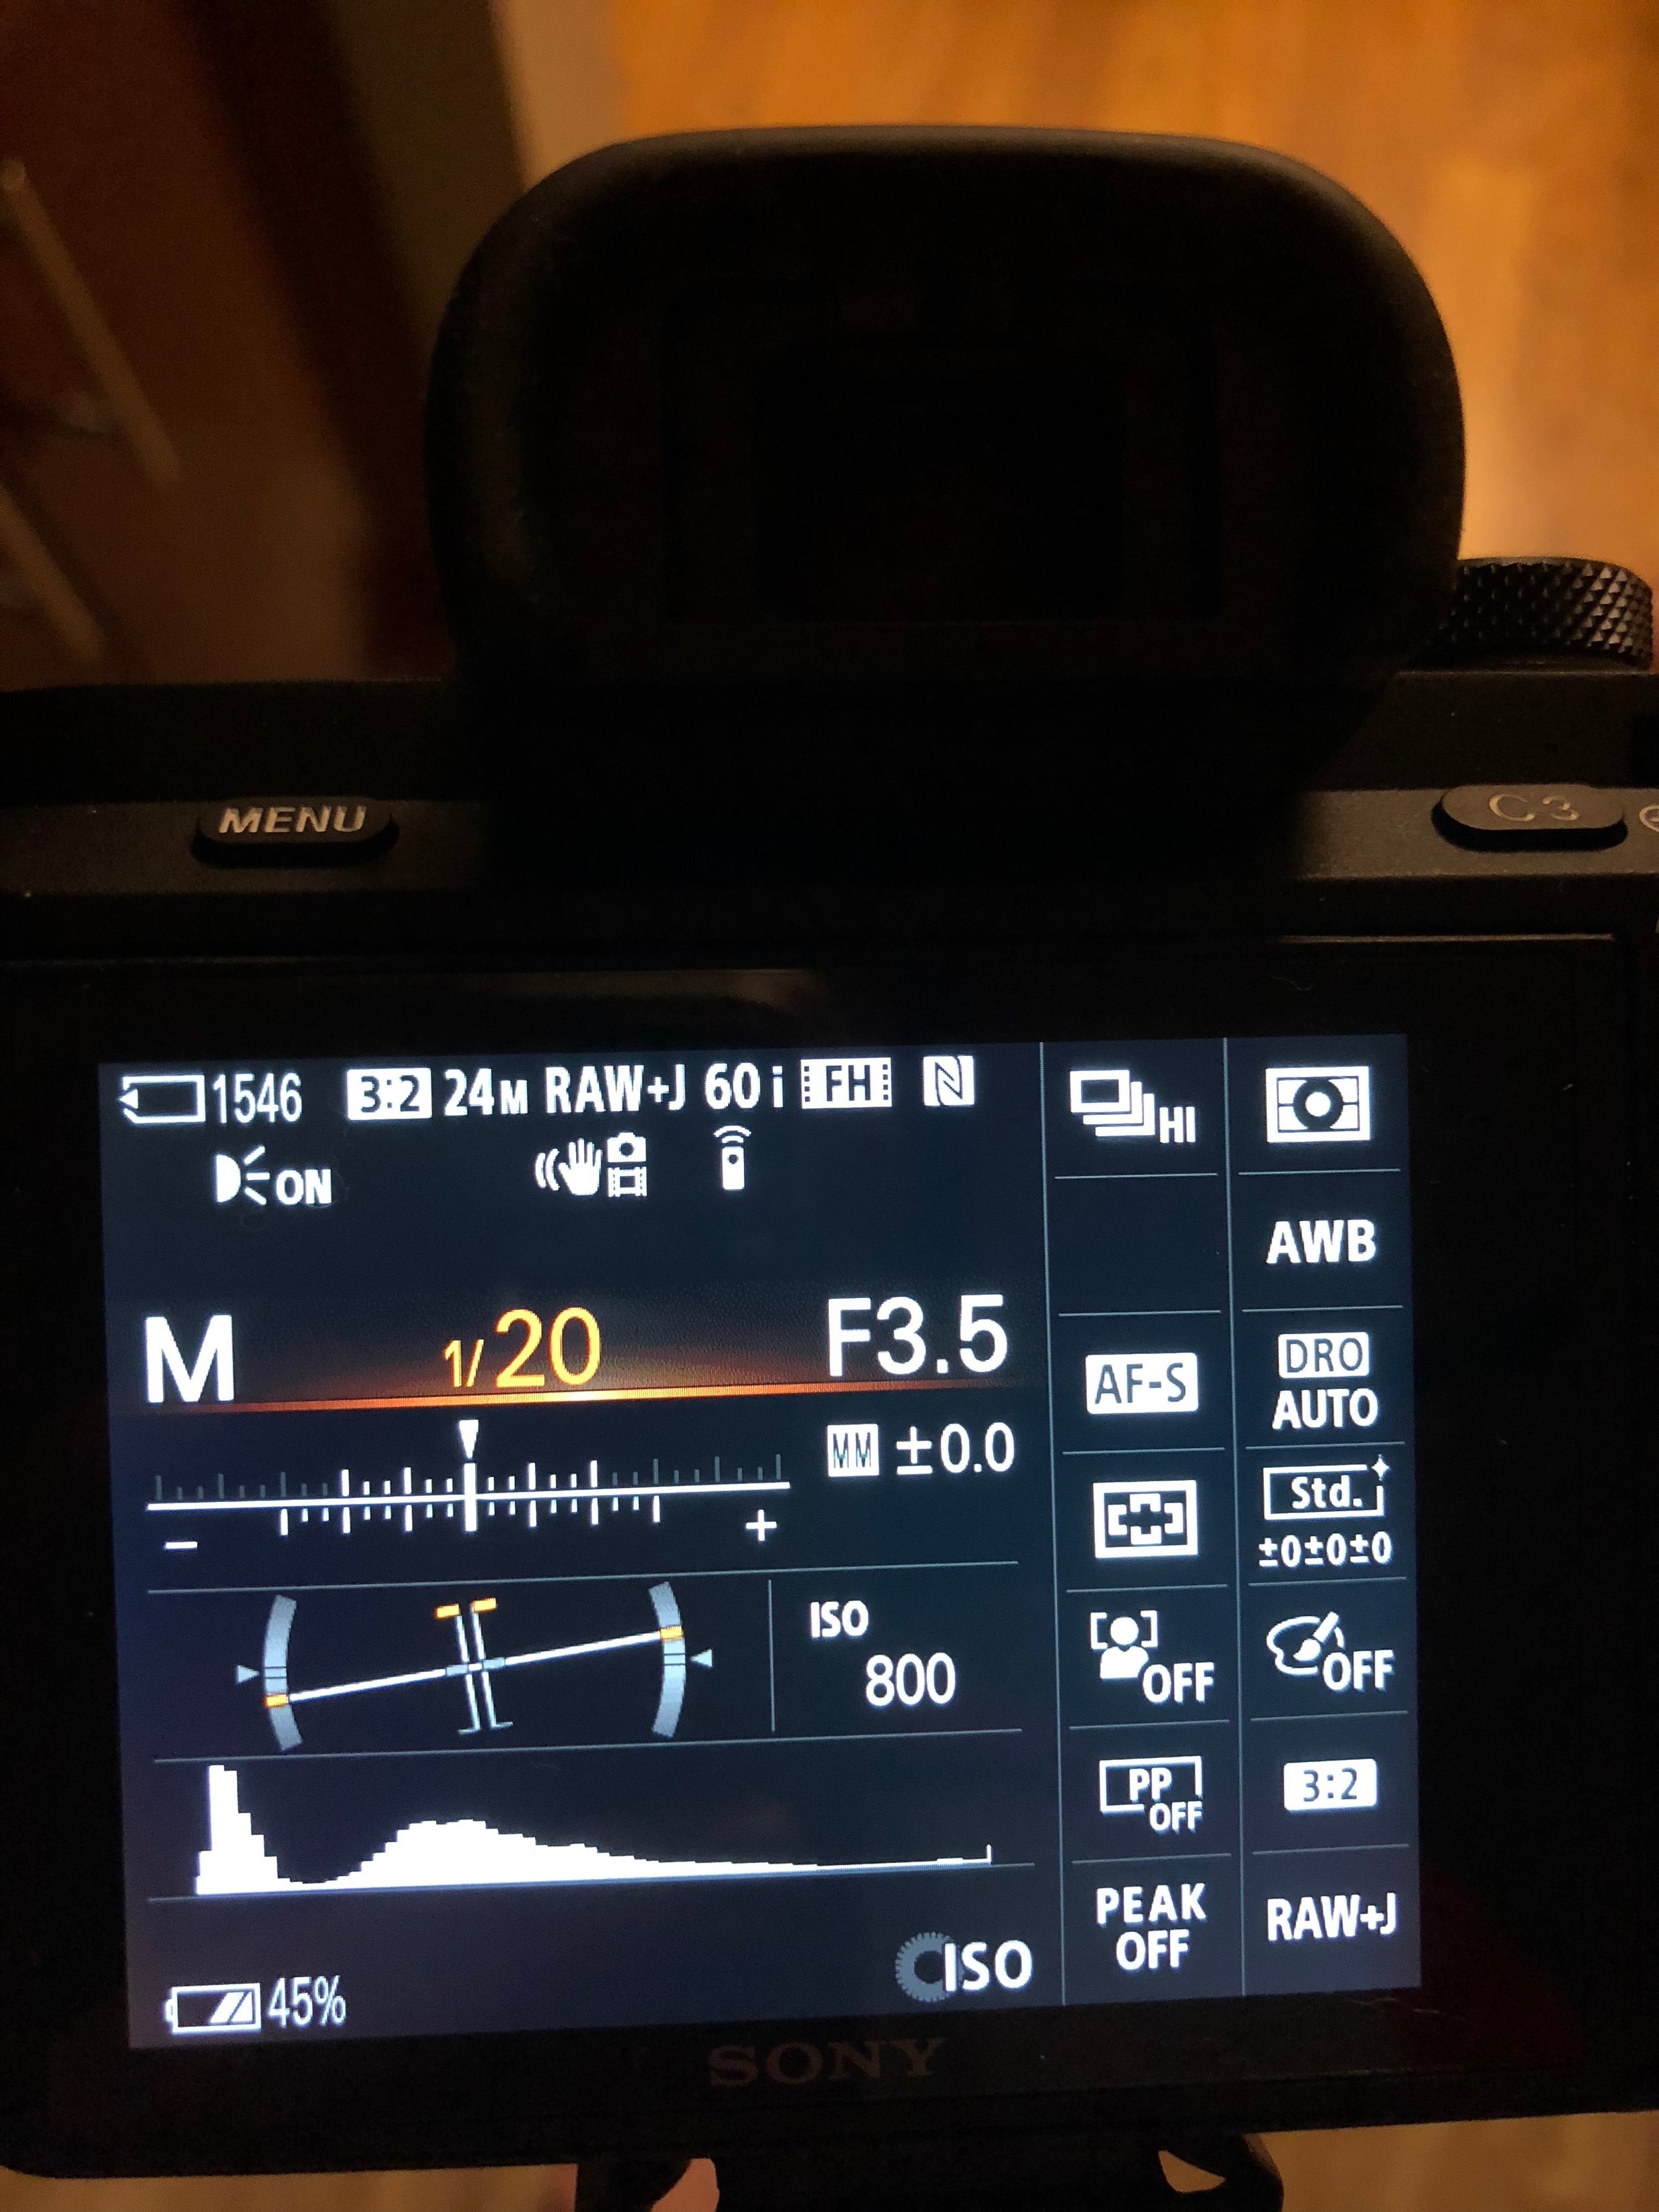
The Light Meter is in the middle, you should be able to see this when you look into your viewfinder.
Notice how the triangle is centered over the center? That is the light meter telling me my photo is properly exposed at these settings which happen to be f3.5, 1/20th of a second, and ISO 800

Notice where the triangle is now that I have chosen a longer shutter speed (1/3 of a second) the triangle moves to the right of the center line telling me my photo is over exposed.

Now I have chosen a faster shutter speed (1/50th) of a second. The triangle moves to the left of the center line telling me my photo will be under exposed.
The light meter will be your best friend when you start shooting in manual, but don't treat it as an end all be all. Your camera doesn't know what kind of photo you want to take, you do. The entire goal of shooting in manual is to have creative control over your photos.
Experiment!
Okay, you have a general idea of what all these settings mean and how they work together. The first thing you should do is get out your camera's user manual and turn your camera onto a manual mode. M is generally the most obvious one but there are usually others as well. Make sure you have control of all three of those settings and you know which wheels control each setting so you can adjust them easily and quickly.
Now get out there and start experimenting! Take some really terrible photos and figure out WHY they are terrible. Is the photo too bright? You have over exposed it! Choose either a smaller aperture or a faster shutter speed and try the shot again. Is the photo too dark? You have under exposed it. Choose a wider aperture or or slower shutter speed and try again. Notice for both of those situations I said change the aperture OR the Shutter speed, not both. For aperture each fstop setting is twice the size of the previous fstop so it allows twice as much light in when you move up, or halves the amount of light let in when you move down. The same goes for shutter speed, each stop is twice the amount of time as the setting before it. If you widen the aperture by one stop and decrease your shutter speed one stop you are effectively letting in 4x the amount of light. It's best to adjust one or the other unless you choose terrible setting to begin with.
If you are struggling with shooting in manual I hope this guide is helpful and makes you feel more comfortable. If you have any questions I would love to answer them and help you out! Remember, this all supposed to be fun. If you find yourself frustrated and hating photography, take a step back and remember why you started! There may be some frustration along the way, but it's all worth it when you get that perfect shot you have been dreaming of!
Pin this post:
